API Products Catalog
In our catalog you will find the API Products available, with their description and an explanation of their functionality, as well as technical documentation for each API. To see the technical documentation, you have to be logged in.
Request samples
Browse until you find the examples that you are looking for.
Sign up
The API Products that you will find in our catalog are available for you to test in a Sandbox environment.
To do this, you just have to sign up. From the "Sign Up" button on our home page, complete the form. From there, you can access your account and manage your applications.
Register your application
In order to use our API Products in a Sandbox environment, you must follow the next steps:
- Log in.
- Create an app.
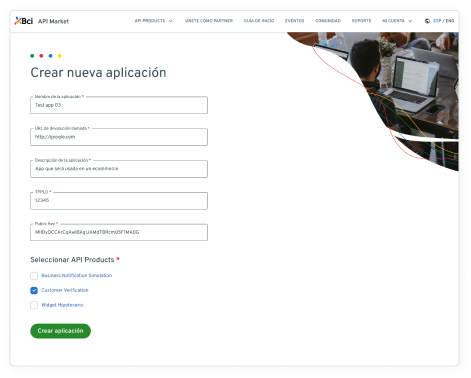
Application Name
You must indicate the name your application has or will have that will use our APIs. This name will be shown to the BCI client when they give consent.
Callback URL
Here you must inform the URL of your site to which the Oauth process ( BCI Access ) must return at the end.
Description
What is your application about?
PublicKey
Generate a pair of public and private keys, if you don't know how at the end of this guide there is a tutorial on how to do it. You must paste the public key in this form. Save the private one because you will use it when you consume the APIs from your application.
TppId
Complete with a 5-digit numeric value that will later be used to inform requests where required by the published APIs.
Associate the API Products that you are interested in consuming.
Test the integration of your application with the API Products in sandbox mode using the technical guides for each API Product.
Dashboard
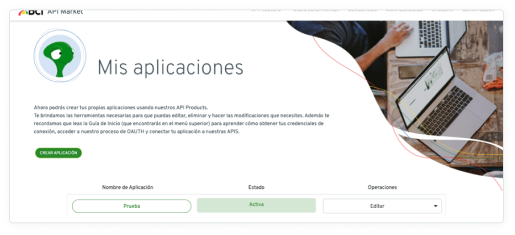
By following these steps, you will successfully register your application. Then, you can go to your personal menu and select "My Applications". In this control panel you will see all the applications you have registered, the consults you have made, etc.
The most important thing about this section is that you will find here the App ID and App Secret ID, which are your credentials to use the BCI APIs.
API call guide
APIs with Bci Access Not Required
If the API Product you want to connect does not require authorization through Bci Access, such as Economic Indicators, the calling procedure would be as follows:
Where:
- {{Your_API_KEY}} : It is the App ID or also called Consumer Key that the API Market gives you when registering your application.
- {{environment}} : [sandbox | prod]
Call procedure
Request sample
curl --location --request GET '
https://apiprogram.bci.cl/{ambiente}/v1/api-economic-indicators/list?query-date=2019-11-26' \
--header 'Content-Type: application/json' \
--header 'x-apikey:{{tu_App_ID}}'
Call procedure
Request sample
curl --location --request GET '
https://apiprogram.bci.cl/{ambiente}/v1/api-economic-indicators/list?query-date=2019-11-26' \
--header 'Content-Type: application/json' \
--header 'x-apikey:{{tu_App_ID}}'
APIs with Bci Access Required
To consume an API with Bci Access, called Private APIs, you must first obtain a code that is used to get an access token and then make the call to the API with it. Is critical that you remember that this code is valid for a specific user and for a limited time.
Step 1: Token request to access AccessRequest
Step 1: Token request to access AccessRequest
Request sample
curl --location --request POST 'https://
apiprogram.bci.cl/{{ambiente}}/v1/api-oauth/
token' \

--header 'Content-Type: application/x-www-
form-urlencoded' \

--data-urlencode 'redirect_uri ={{CallbackUrl}}' \

--data-urlencode
'client_assertion={{JWT_Oauth}}' \

--data-urlencode 'grant_type=client_credentials' \

--data-urlencode 'scope=access-requests'
Where the required parameters should be set:
| Parameter in | Name | Value | Required |
|---|---|---|---|
| Header | Content-Type | application/x-www-form-urlencoded | Yes |
| data-urlencode | grant_Type | client_credentials | Yes |
| data-urlencode | redirect_url | {{Callbackurl}} Url especificada como Url de devolución de llamada en el API Market para tu aplicación | Yes |
| data-urlencode | |||
| data-urlencode | scope | {{scope}} ámbito para el cual se requiere un acceso. Los valores de “scope” están detallados en la documentación particular de cada producto. En este caso es access-request | Yes |
| data-urlencode | client_assertion | {{JWT_Oauth}} firmado con la clave privada correspondiente a la clave pública cargada en el developer app. Campos: { “iss”:”{{tu_API_KEY}}”, “credentials”:”tu_API_KEY_SECRET” } | Yes |
Response
Request sample
{
    "access_token": "{{access_token}}",
    "token_type": "Bearer",
    "expires_in": 3599
}
Step 1: Token request to access AccessRequest
Request sample
curl --location --request POST 'https://
apiprogram.bci.cl/{{ambiente}}/v1/api-oauth/
token' \

--header 'Content-Type: application/x-www-
form-urlencoded' \

--data-urlencode 'redirect_uri ={{CallbackUrl}}' \

--data-urlencode
'client_assertion={{JWT_Oauth}}' \

--data-urlencode 'grant_type=client_credentials' \

--data-urlencode 'scope=access-requests'
Response
Request sample
{
    "access_token": "{{access_token}}",
    "token_type": "Bearer",
    "expires_in": 3599
}
Step 2: Call to AccessRequest
Use the access token obtained in the previous step to request start an Access Request process for the product (Scope) you want to consume. Example: customers.
Where the required parameters should be set:
Step 2: Call to AccessRequest
Request sample
curl --location --request POST 'https://
apiprogram.bci.cl/{{ambiente}}/v1/
api-access-requests/requests' \
--header 'Authorization: Bearer
{{access_token}} \
--header 'Content-Type: application/json' \
--data-raw '{
    "Data": {
        "TppId": "{{tu_TppId}}",
        "Scope": "{{scope}}"
    }
}'
| Parameter in | Name | Value | Required |
|---|---|---|---|
| Header | Authorization | Bearer {{access_token}}, donde {{access_token}} es el token recibido en el paso anterior | Yes |
| Header | Content-Type | application/x-www-form-urlencoded | Yes |
| Header | Content-Type | application/json | Yes |
| Body | { “Data”:{ “Tppld”:{{Tppld}}” “Scope”:{{Scope}}” } } | Tppld: corresponde al identificador de 5 dígitos que le asignaste a tu aplicación en el API Market. Scope: ámbito para el cual se requiere un acceso. Los valores de “scopes” están detallados en la documentación particular de cada producto. Ejemplo: “customers”. | Yes |
Response
Request sample
{
    "Request": {
        "RequestId":
    "5f6a1aa4a485c100076610cf",
        "CreationDateTime":
    "2020-09-22T12:27:23-03:00",
        "Data": {
            "TransactionFromDateTime":
    "2020-09-22T12:27:23-03:00",
            "TransactionToDateTime":
            "2021-03-21T12:27:23-03:00",
            "ExpirationDateTime":
    "2020-10-22T12:27:23-03:00"
        },
        "Status": "AwaitingAuthorization",
        "TppId": "{{tu_TppId}}",
        "Scope": "customers"
    }
}
Step 2: Call to AccessRequest
Request sample
curl --location --request POST 'https://
apiprogram.bci.cl/{{ambiente}}/v1/
api-access-requests/requests' \
--header 'Authorization: Bearer
{{access_token}} \
--header 'Content-Type: application/json' \
--data-raw '{
    "Data": {
        "TppId": "{{tu_TppId}}",
        "Scope": "{{scope}}"
    }
}'
Response
Request sample
{
    "Request": {
        "RequestId":
    "5f6a1aa4a485c100076610cf",
        "CreationDateTime":
    "2020-09-22T12:27:23-03:00",
        "Data": {
            "TransactionFromDateTime":
    "2020-09-22T12:27:23-03:00",
            "TransactionToDateTime":
    "2021-03-21T12:27:23-03:00",
            "ExpirationDateTime":
    "2020-10-22T12:27:23-03:00"
        },
        "Status": "AwaitingAuthorization",
        "TppId": "{{tu_TppId}}",
        "Scope": "customers"
    }
}
Step 3: Call to oAuth Authorize
Step 3: Call to oAuth Authorize
Execute call to:
curl --location --request POST ‘https://
apiprogram.bci.cl/{{ambiente}}/v1/
api-oauth/authorize?
response_type=code&client_id={{tu_App_ID}}
&redirect_uri=
{{CallbackUrl}}&state={{uudiv1}}
&nonce={{uuidv4}}&scope={{Scope}}&request=
{{JWT_Auth}}’
--header 'Content-Type: application/json' \
--header 'x-apikey:  {{tu_App_ID}}'
Where {{ environment }} : [sandbox | prod]
| Parameter in | Name | Value | Required |
|---|---|---|---|
| query-param | response_type | code | Yes |
| query-param | Client_id | {{tu_API_key}}: Es el API Key o también llamado Consumer Key que te entrega el API Market al registra tu aplicación. | Yes |
| query-param | redirect_url | {{CallbackUrl}}: parámetro que especificaste como url de devolución de llamada en el API Market para tu aplicación. | Yes |
| query-param | state | {{state}}:uuid v.1 generado para esta transacción. | Yes |
| query-param | nonce | {{nonce}}:uuid v.4 generado para esta transacción. | Yes |
| query-param | scope | {{scope}}: ámbito para el cual se requiere un acceso. Los valores “scopes” están detallados en la documentación particular de cada producto. | Yes |
| query-param | request | {{JWT_Auth}}: JWT firmado con la clave privada correspondiente a la clave pública cargada en el developer app. { “iss”: “https://api.openbank.com”, “responde_type”:”code”, “client_id”:{{tu_API_key}}, “redirect_url”:{{callbackurl}}, “scope”:{{scope}}, “state”:{{state}}, “nonce”:{{nonce}}, “claims”:{ “id_token”: { “openbanking_intent_id”: { “value”:”urn:openbanking:intent:” + {{scope}} + {{requestid}}, “essential”: true }, “acr”: { “essential”: true } } } } Los valores de los campos de JWT tu_API_key, Callbackurl, scope, state y nonce deben ser los mismo que los enviados en la url de la llamada a la API. Ver cómo generar un token jwt. |
Yes |
| Header | Content-Type | application/json | Yes |
| Header | x-apiket | {{tu_API_Key}} | Yes |
Response
Request sample
{{CallbackUrl}}?code={{codigoCliente}}
The response to this call is a 302 code that will redirect your site or app to the Bci ACCESS site of Bci. The client must complete the steps indicated and at the end of the process the same Bci Access will return to the redirection url that you indicated when registering your application (CallbackUrl) together with the client code required for the execution of the last step. This customer code lasts 30 days and will allow you to consume the product associated with the customer for which you made the process. We suggest you store it so you don't have to go through the Oauth process again.
Sandbox Data:
To run the Bci Access app, enter a RUT (valid) and password (with value: 111222) in any of the three available banks.
Exception flows:
Two exception flows are presented so that you can visualize the error structure returned in these situations:
| Cases | RUT | Actions |
|---|---|---|
| Every Bank: blocked password. | 33333333-3 | Return "locked password" error with the corresponding error redirect |
| SME Banking: Requirement to sign more representatives. | 44444444-4 | Error returned referring to the need for the signature of a second representative, with the corresponding error redirect. |
Step 3: Call to oAuth Authorize
Execute call to:
curl --location --request POST ‘https://
apiprogram.bci.cl/{{ambiente}}/v1/
api-oauth/authorize?
response_type=code&client_id={{tu_App_ID}}
&redirect_uri=
{{CallbackUrl}}&state={{uudiv1}}
&nonce={{uuidv4}}&scope={{Scope}}&request=
{{JWT_Auth}}’
--header 'Content-Type: application/json' \
--header 'x-apikey:  {{tu_App_ID}}'
Response
Request sample
{{CallbackUrl}}?code={{codigoCliente}}
Step 4: Obtain the Authorization Token in OAuth
To finish, you must invoke the token method to generate the Authorization Token that will allow you to access the desired API.
Step 4: Obtain the Authorization Token in OAuth
curl --location --request POST 'https://
apiprogram.bci.cl/{{ambiente}}/v1/
api-oauth/token' \
--header 'Content-Type: application/x-www-
form-urlencoded' \
--data-urlencode
'grant_type=authorization_code' \
--data-urlencode
'redirect_uri={{CallbackUrl}}' \
--data-urlencode 'client_id={{tu_API_KEY}}’ \
--data-urlencode 'code={{codigoCliente}}' \
--data-urlencode 'scope={{scope}} \
--data-urlencode
'client_assertion_type=urn:ietf:params:oauth:client
-assertion-type:jwt-bearer' \
--data-urlencode
'client_assertion={{JWT_Oauth}}'
Where the required parameters should be set:
| Parameter in | Name | Value | Required |
|---|---|---|---|
| Header | Content-Type | application/x-www-form-urlencoded | Yes |
| data-urlencode | grant_type | authorization_code | Yes |
| data-urlencode | redirect_url | {{CallbackUrl}}: Url que especificaste como url de devolución de llamada en el API Market para tu aplicación | Yes |
| data-urlencode | client_id | {{tu_API_Key}}: Es el API Key o también llamado Consumer Key que te entrega el API Market al registrar tu aplicación. | Yes |
| data-urlencode | code | {{codigoCliente}} Codigo obtenido en la respuesta del Paso 3. | Yes |
| data-urlencode | scope | {{scope}}: Ámbito para el cual se requiere un acceso. Los valores de "scopes" están detalladosen la documentación particular de cada producto. Ejemplo: "customers" | Yes |
| data-urlencode | client_assertion_type | urn:ietf:params:oauth:client-assertion-type:jwt-beare | Yes |
| data-urlencode | client_assertion | {{JWT_Oauth}} JWT firmado con la clave privada correspondiente a la clave pública cargada en el developer app. Campos: { "iss": "{{tu_API_KEY}}", "credentials": "tu_API_KEY_secret" } Ver cómo generar un token jwt. |
Yes |
Response
Request sample
{
    "access_token":
    "PPTHdpasasfaguyrrWDH0RC56RBv",
    "token_type": "Bearer",
    "refresh_token":
    "GzXLmCagsmaiiaytinj0LzNp0IGy",
    "expires_in": 3599
}
Step 4: Obtain the Authorization Token in OAuth
curl --location --request POST 'https://
apiprogram.bci.cl/{{ambiente}}/v1/
api-oauth/token' \
--header 'Content-Type: application/x-www-
form-urlencoded' \
--data-urlencode
'grant_type=authorization_code' \
--data-urlencode
'redirect_uri={{CallbackUrl}}' \
--data-urlencode 'client_id={{tu_API_KEY}}’ \
--data-urlencode 'code={{codigoCliente}}' \
--data-urlencode 'scope={{scope}} \
--data-urlencode
'client_assertion_type=urn:ietf:params:oauth:client
-assertion-type:jwt-bearer' \
--data-urlencode
'client_assertion={{JWT_Oauth}}'
Response
Request sample
{
    "access_token":
    "PPTHdpasasfaguyrrWDH0RC56RBv",
    "token_type": "Bearer",
    "refresh_token":
    "GzXLmCagsmaiiaytinj0LzNp0IGy",
    "expires_in": 3599
}
Optional Step: Obtain the Refresh Access Token to oAuth Authorize
In case of expiration of the Access Token obtained, it is possible to generate a new token from the refresh token (previously received)
Optional Step: Obtain the Refresh Access Token to oAuth Authorize
POST /{{api_env}}/v1/api-oauth/token
Donde {{api_env}}: [sandbox | prod]
curl --location --request POST '{{host-
endpoint}}/{api_env}/v1/api-oauth/token' \
--header 'Content-Type: application/x-www-
form-urlencoded' \
--data-urlencode 'grant_type=
refresh_token' \
--data-urlencode
'client_id={{LOrx7gHAMo4irOqWTSzrB5zNMRxgePJ}}' \
--data-urlencode
'client_secret={{cdysiRU6}}' \
--data-urlencode ' refresh_token={{
refresh_token }}'
Where the required parameters should be set:
| Parameter in | Name | Value | Required |
|---|---|---|---|
| Header | Content-Type | application/x-www-form-urlencoded | Yes |
| data-urlencode | grant_type | refresh_token | Yes |
| data-urlencode | client_id | {{client_id}}: valor del apikey | Yes |
| data-urlencode | client_secret | {{code}}: valor del api secret | Yes |
| data-urlencode | refresh_token | {{refresh_token}}: valor del refresh obtenido en el paso 4 | Yes |
Response
Request sample
{
    "access_token": "string",
    "token_type": "string",
    "refresh_token": "string",
    "expires_in": 0,
    "id_token": "string"
}
Optional Step: Obtain the Refresh Access Token to oAuth Authorize
POST /{{api_env}}/v1/api-oauth/token
Donde {{api_env}}: [sandbox | prod]
curl --location --request POST '{{host-
endpoint}}/{api_env}/v1/api-oauth/token' \
--header 'Content-Type: application/x-www-
form-urlencoded' \
--data-urlencode 'grant_type=
refresh_token' \
--data-urlencode
'client_id={{LOrx7gHAMo4irOqWTSzrB5zNMRxgePJ}}' \
--data-urlencode
'client_secret={{cdysiRU6}}' \
--data-urlencode ' refresh_token={{
refresh_token }}'
Response
Request sample
{
    "access_token": "string",
    "token_type": "string",
    "refresh_token": "string",
    "expires_in": 0,
    "id_token": "string"
}
Errors
All of our APIs will respond with the following return codes:
| HTTP Code | Message |
|---|---|
| header | Content-Type |
| 200 | Success |
| 400 | Bad Request |
| 401 | Missing/Invalid Access Token |
| 403 | Invalid Scope |
| 404 | Not Found |
| 406 | Invalid Accept Header |
| 429 | Quota Limit Exceeded |
| 500 | Internal Server Error |
Error Response Format:
{
    "Error": {
        "Status": "string",
        "Code": "string",
        "Title": "string",
        "DeveloperMessage": "string",
        "Sources": {
            "Parameter": "string"
        }
    }
}
Error Response Format:
{
    "Error": {
        "Status": "string",
        "Code": "string",
        "Title": "string",
        "DeveloperMessage": "string",
        "Sources": {
            "Parameter": "string"
        }
    }
}
How to generate JWT Token for call to oauth / token
The JWT Token required to invoke the api-oauth and obtain a token, must contain the following information:
| Header | Payload |
|---|---|
|
{ "alg": "RS256", "expiresIn": "1h" } |
{ |
This Access Request token must be signed by your RSA private key.
How to generate JWT Token for call to oauth / authorize
The JWT Token required to invoke the api-oauth authorize and obtain the client code, must contain the following information:
| Value | Required |
|---|---|
|
{ |
{ |
Where your payload must contain the API Key and Secret API Key credentials, delivered when registering an app in our portal..
This Access Request token must be signed by your RSA private key.
How to generate a public key and private key pair
The JTW mentioned in the previous step requires a private key. This can be generalized as follows.
Private key
Execute the following command in a console to generate your private key openssl genrsa -out private.pem 2048
This will leave a file called private.pem in the path where you ran the command. The file will contain the string that corresponds to your key / private key. You will use this string to generate the JTW with which you will consume the APIs.
Public key
Execute the command in the console within the same path above: openssl rsa -in private.pem -outform PEM -pubout -out public.pem
This will leave a file called public.pem in the path where you ran the command. The file will contain the string that corresponds to your public key. You will use it to register your application here in the API Market.
Glossary of terms
SANDBOX ENVIRONMENT:
Also called a test environment, it is an environment with the same characteristics as the production environment where APIs can be executed with dummy test data.
BCI Access
Application that guarantees the authentication of Bci clients for the granting of consents to third parties on the use of personal information; as well as identity verification with a second security factor.